


Product Description
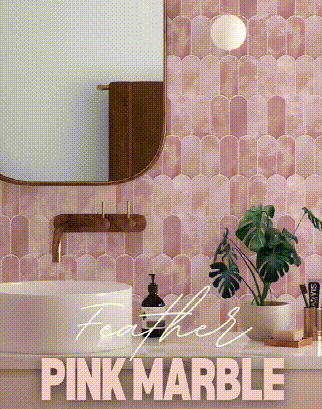
Introducing our exclusive Self-adhesive 3D Feather Marble Sticker – a standout addition to any space! Designed with a delicate feather pattern, this tile showcases soft, blended hues with a refined marble texture. The subtle veining and natural stone-inspired finish give it an elegant, high-end look without the hassle of real marble. Easy to apply and completely mess-free, it's the perfect way to bring a touch of luxury to your home in minutes!
The thicker material (2.5mm), makes this tile realistic and extremely easy to lay. To ensure you have sufficient tiles for your project, we encourage you to purchase a few additional tiles for any mistakes (measure twice, cut once).


Stick-on Tile Features
- Waterproof (great for splashbacks)
- Super easy to clean
- Realistic look (3D shape)
Why buy our Stick-on Tiles?
- Stronger tile adhesive (up to 2 times stronger)
- Thicker material for a more luxurious look
- A wider range of styles, colours and shapes
- Super easy installation simply cut with a sharp Stanley knife
Tile Sheet Specifications
- Dimensions: 30.5 cm x 30.5 cm (12 inch x 12 inch)
- Thickness: 2.5mm, Standard across our whole range
- Sheets per pack: 10 sheets of tiles
What you’ll need
- Cutting surface (e.g. thick cardboard or scrap timber)
- Ruler
- Stanley knife (fresh blade) or sharp scissors
- Pencil
- Cleaning agent (sugar soap or mild dishwashing liquid)
- Cleaning cloth & bucket of warm water
- Fine sandpaper (to key glossy/painted surfaces)
Step-by-step
 |
Step 1 — Clean the surface Remove dust, grease and debris using a gentle cleaner (sugar soap works well). Rinse and allow to dry completely before installing. |
||||
 |
Step 2 — Measure & plan
Confirm quantities, choose your layout/direction and mark a straight baseline. Measure twice to avoid cutting errors. |
||||
 |
Step 3 — Cut the first sheet
On a safe cutting surface, use a sharp knife and ruler to trim to size. Start from a straight reference edge for a consistent finish. |
||||
 |
Step 4 — Peel & place
Partially peel the adhesive film, align carefully to your baseline, then press from the centre outwards to bond and remove bubbles. |
||||
 |
Step 5 — Align the next sheet
Match pattern and grout lines sheet-by-sheet for a seamless look. Keep off-cuts for infills and smaller gaps. |
||||
 |
Step 6 — Finish & seal
For a pristine result, run a bead of silicone (matching the grout colour) along exposed edges and corners. |
||||
Bathrooms & wet areas
Vinyl and Composite tiles are water-resistant and ideal for splashbacks, laundries and bathroom features. For areas with direct water exposure (e.g. shower recesses), add extra waterproofing by sealing all edges and corners with silicone, and filling joins or bevels with silicone or an epoxy grout.
Wipe with a soft cloth and mild detergent. Avoid harsh chemicals or abrasive tools. Designed for indoor use and smooth, sound surfaces.